Introduction
Holders of Taiwan passports cannot enter Indonesia visa-free, but the good news is that the process is straightforward. In 2026, the most convenient approach is to apply for the Electronic Visa on Arrival (e-VOA) before departure, fill out the All Indonesia Arrival Card, and — if your trip includes Bali — pay the Bali Tourist Levy. Three steps may sound like a lot, but each one takes less than 10 minutes. You can complete everything the night before your flight.
This guide walks you through every step in detail. Just follow along and you won’t run into any issues.
1. Visa Guide: e-VOA (Electronic Visa on Arrival) Application Tutorial
All travelers entering Indonesia with a Taiwan passport — including destinations like Bali, Jakarta, Yogyakarta, and every other region — must obtain a visa. The most recommended option is the Electronic Visa on Arrival (e-VOA), which is fully processed online. Once approved, you can use the automated e-Gate at the airport, saving you the time of queuing on-site to pay.
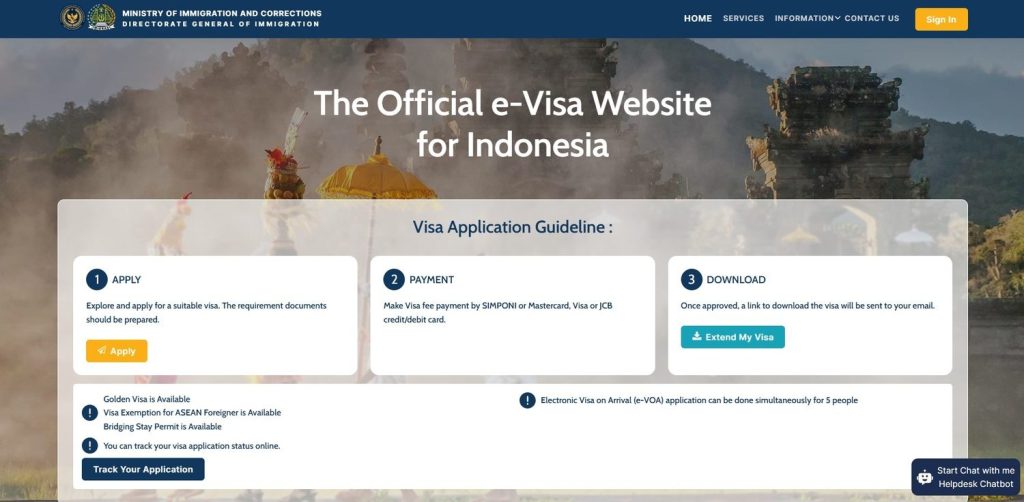



e-VOA Key Information
| Item | Details |
|---|---|
| Fee | IDR 500,000 (~USD 31) |
| Duration of Stay | 30 days, extendable once (additional 30 days, max 60 days total) |
| Processing Time | 1–3 business days (usually approved within a few hours) |
| Validity Period | Must enter Indonesia within 90 days of issuance |
| Entry Type | Single entry |
| Ports of Entry | All international airports and major seaports |
| Official Website | evisa.imigrasi.go.id |
Application Steps
Step 1: Prepare Your Documents
- Passport valid for at least 6 months from the date of entry, with at least 2 blank pages
- Passport-style photo with white background (color photo taken within the last 6 months)
- Return ticket or onward ticket to a third country (English version in PDF)
- Accommodation booking confirmation in Indonesia (including full address and postal code)
- International credit card (Visa, Mastercard, or JCB accepted)
Step 2: Go to the Official Website
Open evisa.imigrasi.go.id, the official e-visa platform of the Indonesian Directorate General of Immigration. Register an account and verify it via email. ⚠️ Never click on agent websites from search engine results — many fake sites charge several times the actual fee in “service charges.” Only trust domains ending in .go.id.
Step 3: Select Visa Type
After logging in, navigate to the application page and select in order:
- Passport issuing country: Type “TAIWAN” and select it
- Purpose of travel: General, Family, Social → Tourism, Family Visit, and Transit
- Visa type: Select “B1 – Tourist (Visa On Arrival)”
- Duration of stay: Select “30 Days”
The system will display the fee breakdown (IDR 500,000). Confirm and continue.
Step 4: Fill in Personal Information
- Your name must exactly match the machine-readable zone at the bottom of your passport (pay attention to the order of surname and given name)
- Double-check digits: the number 0 vs. the letter O, and the number 1 vs. the letter I
- The accommodation address must be complete, including street name, city, and postal code — once you enter a valid postal code, the system will auto-fill the province, city, district, and corresponding immigration office
⚠️The accommodation address field only accepts a single line — no line breaks, and no special characters like “&” or “/”, or the system will return an error.
Step 5: Upload Documents and Pay
Upload a scan of your passport bio page and your passport photo (JPEG format, recommended under 200KB). After confirming all information is correct, pay IDR 500,000 online via Visa/Mastercard/JCB.
Step 6: Receive and Print Your Visa
Within a few hours to 3 business days, you will receive an email with the e-VOA attached as a PDF. Download it and print at least 2 copies on A4 paper in color. Also save a copy on your phone as a backup. At immigration, present this printout along with your passport to use the automated e-Gate.
Comparison of Three Visa Options
| Criteria | e-VOA (Electronic Visa on Arrival) | Visa on Arrival (VOA) at Airport | B211A Tourist Visa |
|---|---|---|---|
| Application Method | Entirely online | On-site at the airport (queue required) | Online application |
| Fee | IDR 500,000 (~USD 31) | IDR 500,000 (cash on-site) | IDR 1,000,000 (~USD 63) |
| Duration of Stay | 30 days (extendable +30 days) | 30 days (extendable +30 days) | 60 days (extendable 2×60 days) |
| Processing Time | 1–3 business days | Issued on the spot | 5–7 business days |
| Airport Queuing | No queue — use e-Gate | Must queue twice (payment + immigration) | No queue — use e-Gate |
| Extension Process | Can be extended online | Must visit immigration office 2–3 times in person | Must visit immigration office in person |
| Best For | General tourists, independent travelers | Last-minute travelers, families with young children | Travelers planning to stay over 30 days |
e-VOA vs. VOA: Why Apply Online?
Both cost exactly the same, but the experience is worlds apart. The airport Visa on Arrival requires you to queue first to pay, then queue again for immigration. During peak hours (especially at Bali’s Ngurah Rai International Airport), this can mean a 1–2 hour wait. With the e-VOA, you simply scan the QR code at the automated e-Gate upon arrival — the entire process takes under 30 seconds. It’s available to anyone aged 6 and above holding an e-passport with a biometric chip.
The only exception is families traveling with children under 6 — young children cannot use the automated gates regardless of which visa type you hold, and must go through the manual immigration counter. In that case, there’s little difference between the VOA and e-VOA.
2. All Indonesia Arrival Card (AIAC)
All Indonesia is a unified electronic arrival declaration system launched by the Indonesian Directorate General of Immigration in September 2025. It replaces the former separate Arrival Card, Customs Declaration (e-CD), and Health Declaration (SATUSEHAT) forms — consolidating them into a single form and a single QR code.
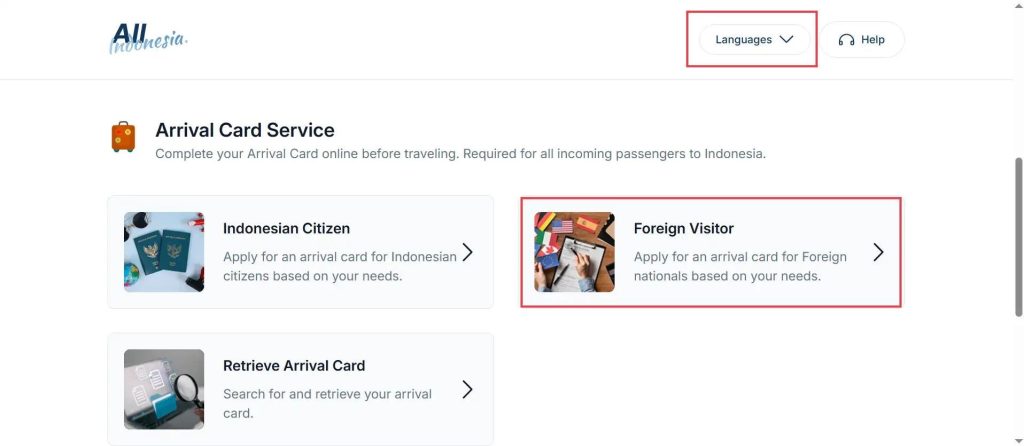
All Indonesia Key Information
| Item | Details |
|---|---|
| Official Website | allindonesia.imigrasi.go.id |
| Fee | Completely free |
| Filling Window | Within 72 hours before arrival (the system won’t accept submissions earlier) |
| Who Must Fill It | All arriving passengers (regardless of nationality or age) |
| Applicable Ports | All international airports (fully enforced from October 1, 2025) |
| Output | Personal QR code (shared by immigration and customs) |
Filling Steps
Step 1: Go to the Official Website
Open allindonesia.imigrasi.go.id on your phone or computer browser and select “Foreign Visitor.” ⚠️ Double-check the .go.id domain — some fake websites charge “processing fees.” Don’t fall for it.
Step 2: Enter Personal Information
All details must match your passport exactly: nationality, full name, date of birth, passport number, passport expiry date, and mobile phone number (remember to include country code +886 and drop the leading 0).
Step 3: Enter Trip Information
Arrival date, departure date, flight number, arrival airport, visa type (select Visa on Arrival or e-VOA).
Step 4: Enter Accommodation Details
Hotel name and address. Make the address as complete as possible and consistent with your booking confirmation.
Step 5: Customs Declaration
Enter the number of bags you’re carrying and whether you have any items to declare (cash, valuables, restricted goods, etc.). If nothing applies, select “Nothing to declare.”
Step 6: Health Declaration
Answer basic health questions: travel history in the past 21 days, any fever or symptoms. These questions were previously part of the separate SATUSEHAT form — now integrated into this single card.
Step 7: Review and Submit
Double-check everything, then submit. The system will generate a QR code and send it to the email address you provided. Be sure to take a screenshot and save it to your phone — airport Wi-Fi can be unreliable, and having it offline will save you. It’s also a good idea to print a paper copy as a backup.
All Indonesia Important Notes
- ⚠️ The form can only be filled within 72 hours before arrival — earlier submissions will not be accepted
- ⚠️ Once submitted, the form generally cannot be edited. If you make a mistake, you’ll need to fill it out again from scratch
- ⚠️ One family member can fill out the form on behalf of the whole family, but each traveler (including infants) receives a separate, individual QR code
- ⚠️ The same QR code is scanned twice: once at immigration and once at customs after baggage claim
- ⚠️ If you forget to fill it out before departure, you can do it on-site at the airport — but expect very long queues
3. Bali Tourist Levy
If your itinerary includes Bali, you’ll need to pay an additional tourist levy. This is mandated by the Bali provincial government and is separate from the national Indonesian visa.
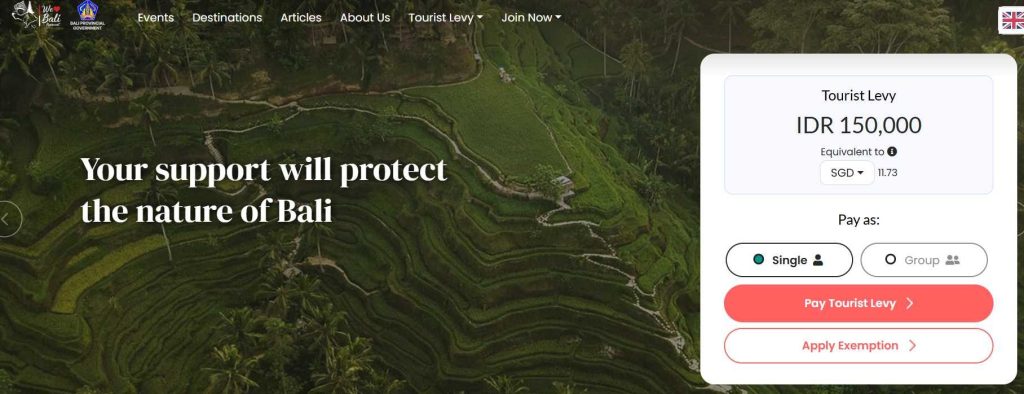
Tourist Levy Key Information
| Item | Details |
|---|---|
| Fee | IDR 150,000 per person (~USD 10) |
| Who Must Pay | All international travelers arriving in Bali (including children) |
| Payment Method | Pay online in advance or on-site at the airport |
| Official Platform | Love Bali official website or app |
| Validity | Pay once per entry into Indonesia that includes a Bali itinerary |
| Proof | QR code (sent via email after payment) |
Payment Methods
Option 1: Pay Online in Advance (Recommended)
- Open the Love Bali website
- Fill in your personal and passport details
- Choose a payment method (credit card / debit card / e-wallet / bank transfer)
- After payment, you’ll receive a QR code receipt — take a screenshot to save it
Option 2: Pay On-Site at the Airport
Payment counters are available in the arrival hall at Ngurah Rai International Airport (DPS). You can pay in cash (Indonesian Rupiah) or by card. However, during peak hours this adds yet another queue to your arrival process.
Exemptions
- Indonesian citizens
- Transit passengers who do not leave the airport
- Diplomatic officials and flight crew members
Frequently Asked Questions
Q: I’m only visiting Yogyakarta or Jakarta, not Bali — do I still need to pay?
No. This levy applies only to foreign travelers arriving in Bali province.
Q: I’m going to Bali first, then Yogyakarta on the same trip — how many times do I pay?
Just once. The levy is charged only once per trip to Indonesia.
Q: What if I leave Bali and then re-enter Bali?
If you leave Indonesia entirely and return, you’ll need to pay again. But if you’re only flying domestically within Indonesia (e.g., Bali → Yogyakarta → Bali), you don’t need to pay again.
4. Customs Declaration
Duty-Free Allowances
| Item | Limit |
|---|---|
| Total value of personal goods | USD 500 per person (arriving by air) |
| Cigarettes | 200 sticks (1 carton) |
| Cigars | 25 sticks |
| Loose tobacco | 100 grams |
| Alcoholic beverages | 1 liter |
| Foreign currency (cash) | Must declare if exceeding IDR 100 million (~USD 6,300) |
| Indonesian Rupiah (cash) | Maximum IDR 1 billion per entry/exit |
Prohibited Items
- ❌ Drugs (any type — violations can carry the death penalty)
- ❌ Weapons and ammunition
- ❌ Endangered wildlife and plant products (ivory, rhinoceros horn, etc.)
- ❌ Pornographic materials (books, videos, discs, etc.)
- ❌ Counterfeit currency and forged goods
- ❌ Fresh fruits, vegetables, meat, and dairy products
Items Requiring Declaration
- Cash or valuables exceeding the duty-free limits
- Professional photography equipment and drones
- Medications exceeding personal-use quantities (must be accompanied by a doctor’s prescription)
- Goods exceeding the duty-free allowance (subject to 10% import duty + 11% VAT)
⚠️ Excess tobacco and alcohol will not be taxed — they will be confiscated and destroyed. Don’t take the risk.
5. Immigration & Arrival Process
Here’s the step-by-step process upon arriving in Indonesia (using Bali’s Ngurah Rai International Airport as an example):
- After disembarking, proceed to the immigration hall
- Present your passport + e-VOA printout (with e-VOA, use the automated e-Gate — scan your passport + facial recognition, cleared in under 30 seconds)
Or present your passport + VOA payment receipt (go through the manual immigration counter) - Show your All Indonesia QR code (scanned during immigration check)
- Proceed to the baggage claim area to collect your luggage
- Show your All Indonesia QR code again (scanned by customs to clear)
If you have items to declare, go through the Red Channel
If you have nothing to declare, go through the Green Channel - Exit the airport terminal
If you still need to pay the Bali Tourist Levy, there are counters and self-service machines before the immigration checkpoint. It’s best to pay online in advance to skip one more queue.
If your documents are in order and you have the e-VOA, you can typically walk out of the airport within 10–15 minutes. Without the e-VOA, expect to queue on-site — during peak hours, this could take 30–60 minutes.
6. Visa Extension
If you plan to stay in Indonesia for more than 30 days, the e-VOA can be extended once for an additional 30 days.
| Item | Details |
|---|---|
| Fee | IDR 500,000 |
| Where to Apply | Any immigration office (Kantor Imigrasi) within Indonesia |
| Recommended Timing | Start the process 7–10 days before your visa expires |
| Time Required | 2–3 business days; in-person appearance required (for photo and fingerprints) |
e-VOA holders can book an appointment and initiate the extension process through the immigration office’s online system, but you still need to visit the immigration office in person to complete biometric registration. Holders of a physical Visa on Arrival will need to visit the immigration office 2–3 times for the extension.
⚠️ The overstay fine is IDR 1,000,000 per day (~USD 63) — don’t overstay.
If you need to stay longer than 60 days, consider applying for the B211A Tourist Visa instead, which grants an initial 60-day stay and can be extended twice, for a maximum of 180 days.
7. Pre-Departure Checklist
Before you leave, go through this checklist to make sure everything is in order:
| Item | Status |
|---|---|
| Passport valid for at least 6 months | ☐ |
| e-VOA (print 2 color copies + save on phone) | ☐ |
| All Indonesia Arrival Card QR code (screenshot + printout) | ☐ |
| Bali Tourist Levy QR code (if itinerary includes Bali) | ☐ |
| Return ticket or onward ticket confirmation | ☐ |
| Accommodation booking confirmation (with full address) | ☐ |
| International credit card (Visa / Mastercard / JCB) | ☐ |
| Essential medications (with prescription) | ☐ |
| Phone set up with international roaming or eSIM ready | ☐ |
8. Frequently Asked Questions (FAQ)
Q: Can Taiwanese citizens enter Indonesia visa-free?
No. Taiwan passport holders currently cannot enter Indonesia without a visa. You must obtain a Visa on Arrival or an Electronic Visa on Arrival (e-VOA).
Q: What if I made a mistake on my e-VOA application?
Once submitted, the e-VOA cannot be modified. If you entered the wrong passport number or name, you’ll need to reapply and pay the IDR 500,000 fee again. Always double-check every field before submitting.
Q: Are the All Indonesia card and e-VOA the same thing?
No. The e-VOA is your visa — it grants you permission to enter Indonesia. The All Indonesia card is an arrival declaration form that records your travel itinerary, customs information, and health status. You need both — neither is optional.
Q: Can I bring an e-cigarette into Indonesia?
E-cigarettes are classified as restricted items and are subject to specific regulations. If they exceed the allowed quantity, they will be confiscated. It’s best not to bring them to avoid any hassle.
Q: How do I get mobile internet in Indonesia?
It’s recommended to purchase an eSIM before departure (many providers offer Indonesia-compatible plans), or buy a local SIM card at the airport. Major Indonesian carriers include Telkomsel, XL, and Indosat. Counters are available at the airport, though prices are slightly higher than in town. ⚠️ If you use a local SIM card for more than 90 days, your phone’s IMEI must be registered with customs and subject to tax.
Q: What’s required when traveling with children?
Children under 6 cannot use the automated e-Gate and must go through the manual immigration counter. Every child (including infants) needs a separate e-VOA and a separate All Indonesia Arrival Card (which can be filled out by a parent on their behalf).
Q: Do I need an e-VOA if I’m taking a ferry from Singapore to Batam?
Yes. A visa is required for entering Indonesia by any means — plane, ferry, or land border. Note: some land border crossings may not support the e-VOA, so it’s advisable to obtain a physical visa in advance for those routes.
Q: How much Indonesian Rupiah cash should I bring?
Credit cards and ATMs are widely available at airports and in major tourist areas. We recommend bringing a small amount of Indonesian Rupiah in cash (roughly USD 95–160 equivalent) for street vendors and taxis, and use your card for the rest.
9. Indonesia & Bali Accommodation Recommendations
Now that your visa and declarations are sorted, it’s time to find a place to stay. tournews.tw has prepared accommodation guides for you:
Last updated: July 7, 2026. Indonesian entry policies are subject to change. Before departure, please verify the latest regulations on the Indonesian Directorate General of Immigration website.